
Feeling frustrated trying to find a quick and reliable technique to export Outlook mail from Mac to Windows in bulk? You’re not alone. Many users struggle with moving their data from Outlook for Mac to Outlook for Windows. To help you out, we’ve explored two effective methods for converting OLM files to PST format. One approach is a manual process, while the other involves using the powerful OLM to PST Converter Tool. In this article, we’ll dive deep into both options, starting with a clear overview of what OLM and PST files actually are.
OLM files, which stand for Outlook Data Files for Mac, are exclusively designed to work with Outlook on macOS. These files hold all your mailbox information, including emails, calendars, tasks, journals, and other related items, and are saved with the *.olm extension.
In contrast, PST files (Personal Storage Table) are used by Outlook on Windows. Unlike OLM files that capture the entire Mac Outlook mailbox in one go, PST files offer more flexibility—they can store either the complete mailbox or individual folders, depending on what you choose to export or save.
Next, let’s take a closer look at why it’s often necessary to export Outlook mail from Mac to Windows.
Why Do Users Export Outlook Mail from Mac to Windows?
- PST files work seamlessly with Microsoft Outlook on Windows and can even be imported into Outlook for Mac. In contrast, OLM files are exclusive to Outlook for Mac. To open OLM files on a Windows system, you’ll need to convert them to PST first.
- If you’re moving from Outlook on a Mac to Outlook on a Windows PC, converting your OLM emails to PST is essential because OLM files aren’t supported on Windows.
- Converting OLM files to PST makes it easier to organize, access, and manage your mailbox data across different platforms without hassle.
Next, we’ll walk you through simple approaches to convert your Mac Outlook OLM files to Windows Outlook PST format with or without Microsoft Outlook installation. Make sure to follow along carefully to ensure a smooth migration.
How to Export Outlook Mail from Mac to Windows Manually?
Follow these five steps carefully to move your OLM files into PST format-
1: Set Up and Activate Your IMAP Account
- Make sure you’ve a current email account with IMAP allowed. If IMAP isn’t activated beforehand, it could cause issues later on.
2: Add Your IMAP Account to Outlook Mac
- Open Mac Outlook and go to Tools > Accounts.
- Hit the ‘+’ icon to add a fresh account.
- Enter your email credentials (username and password).
- For the incoming server, enter imap.gmail.com.
- For the outgoing server, check Use SSL Connect and enter smtp.gmail.com.
- Set the outgoing port to 465 and click Add Account.
- You’ll see a yellow button prompting you to enter your password—do so to confirm the connection.
3: Move OLM Data to Your Gmail Account
- Select the OLM folders you want to transfer.
- Copy these folders and paste them into your IMAP Gmail account inside Mac Outlook.
- Once the data uploads, refresh your Gmail inbox.
4: Sync Your Gmail Account with Windows Outlook
- Open Outlook on your Windows PC and click File > Account Settings.
- Choose New to add an account manually.
- Select Manually Setup or Additional Server Types, then choose IMAP.
- Enter your Gmail credentials.
- Use imap.gmail.com for the incoming server and smtp.gmail.com for the outgoing server.
- Under More Settings > Outgoing Server, check My outgoing server requires authentication.
- In the Advanced tab, set the incoming server port to 993 with SSL encryption, and the outgoing server port to 465.
- Test the account setup and click Finish once successful.
5: Export Data from Gmail to Windows Outlook Mailbox
- After syncing, you can easily export your emails from the Gmail account to your local Windows Outlook mailbox.
- This completes the process of converting OLM files to PST format for use on Windows.
Disadvantages of the Manual Way
While the manual method is free, it comes with several challenges you should be aware of before proceeding:
- The process is time-consuming and can take a long time to complete.
- There’s a risk of getting stuck or encountering errors midway.
- You might lose important data during the transfer.
- The results are not always reliable or satisfactory.
- Only a limited number of OLM files can be converted at once.
- Missing or skipping any step can cause partial or total data loss.
How to Export Outlook Mail from Mac to Windows in Bulk? – With Automated & Expert Solution
For a quick and precise solution, the CubexSoftt OLM to PST Converter Tool stands out as one of the best tools to convert OLM files to PST. This versatile software ensures a smooth and efficient conversion process, handling all your mailbox data including emails, calendars, notes, attachments, and other important items without any data loss. Moreover, it’s fully compatible with all versions of Mac OS, making it easy to use regardless of your system.
Beyond PST conversion, this tool also supports exporting OLM files to various other formats like PDF, EML, MSG, CSV, ICS, MBOX, HTML, MHT, RTF, vCard, and more. It even enables direct conversion to popular email platforms such as Gmail, IMAP, Yahoo, Hosted Exchange Server, Office 365, Amazon WorkMail, Thunderbird, Zimbra, and others, offering you the flexibility to manage your data across different services with ease.
Working Steps to Export Outlook Mail from Mac to Windows in Bulk
Download and launch the OLM to PST Conversion Tool.

Use the Select Files or Select Folder option to add your OLM files into the software.

Preview the mailbox contents in the folder tree and select the specific folders or emails you want to convert.

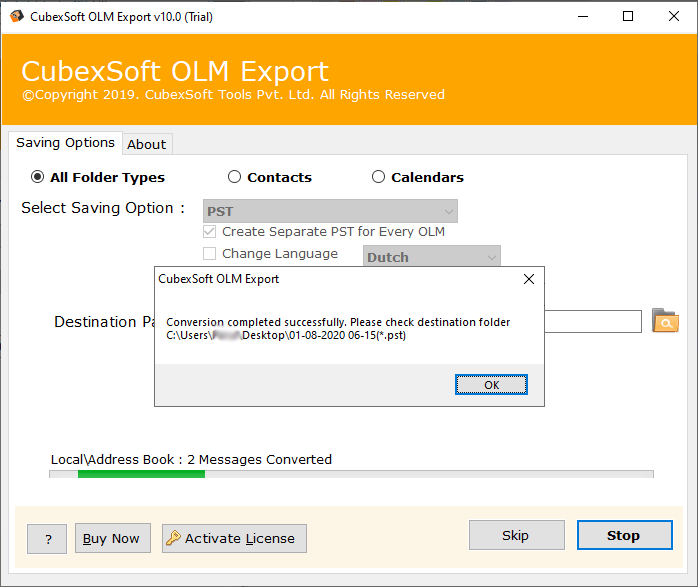
From the Select Saving Option drop-down menu, choose PST as your desired output.

Tap on the Convert button to start transferring your OLM data to PST format.

With just a few clicks, you’ll have your OLM files converted to PST, ready to use in Windows Outlook efficiently and safely.
Last Lines!
This guide is designed to help you convert OLM files to PST safely and effectively. You can choose between the manual method and professional, faster solution based on your needs. If you’re still unsure which option suits you best, try the demo version of the OLM Converter. It’s a great way to test the tool and decide confidently before completing your conversion.